POW #14 - Exchange Server 2010 & Event ID 106

January 26, 2011 at 10:54 AMSaso Erdeljanov

POW_Blue_S

You might experience some errors in Application log after Microsoft Exchange RPC Client Access service is started. I saw this issue on servers with only Mailbox Role installed. Although CAS role has also service named Microsoft Exchange RPC Client Access I did not see this issue if CAS Role is installed on server without Mailbox  Role.

image

All errors are from Performance counter category name MSExchange RpcClientAccess.

Event ID 106, Source MSExchange Common, Level Error:

Log Name:      Application
Source:        MSExchange Common
Date:          24.1.2011 21:25:17
Event ID:      106
Task Category: General
Level:         Error
Keywords:      Classic
User:          N/A
Computer:      ServerName.fqdn.local
Description:
Performance counter updating error. Counter name is RPC Requests, category name is MSExchange RpcClientAccess. Optional code: 3. Exception: The exception thrown is : System.InvalidOperationException: The requested Performance Counter is not a custom counter, it has to be initialized as ReadOnly.
   at System.Diagnostics.PerformanceCounter.Initialize()
   at System.Diagnostics.PerformanceCounter.set_RawValue(Int64 value)
   at Microsoft.Exchange.Diagnostics.ExPerformanceCounter.set_RawValue(Int64 value)
Last worker process info : System.UnauthorizedAccessException: Access to the registry key 'HKEY_LOCAL_MACHINE\SOFTWARE\Microsoft\ExchangeServer\v14\Transport' is denied.
   at Microsoft.Win32.RegistryKey.Win32Error(Int32 errorCode, String str)
   at Microsoft.Win32.RegistryKey.CreateSubKey(String subkey, RegistryKeyPermissionCheck permissionCheck, RegistrySecurity registrySecurity)
   at Microsoft.Exchange.Diagnostics.ExPerformanceCounter.GetLastWorkerProcessInfo()

There is nothing to worry about this error. Microsoft published article KB982679 - Event ID 106 is logged when you start the RPC Client Access service on Exchange Server 2010.

This problem occurs because the performance counters of the RPC Client Access service are not installed when you install only the Mailbox role on an Exchange Server 2010 server. However, this does not affect the functionality of the Exchange Server 2010 server.

It’s not so pretty to see many errors in Event Viewer after  restarting Microsoft Exchange RPC Client Access service. Let’s try to manually add RPC Client Access performance counters.

Manually add RPC Client Access performance counters

  • Start Exchange Management Shell
  • Add-PSSnapin Microsoft.Exchange.Management.PowerShell.Setup
  • New-PerfCounters -DefinitionFileName "C:\Program Files\Microsoft\Exchange Server\V14\Setup\Perf\RpcClientAccessPerformanceCounters.xml"

    image
  • Restart server or Microsoft Exchange RPC Client Access service.
  • No errors, happy administrators… Winking smile

Links:

Posted in: Exchange | Microsoft | POW

Tags:

POW #13 – Exchange Server 2007 SP2 (Part 3)

April 1, 2010 at 9:49 PM2102

POW_Blue_SIn previous parts we looked into necessary procedures for preparing Active Directory and upgrading HUB/CAS/MBX roles (or single Exchange Server with HUB, CAS and Mailbox role installed) to Service Pack 2.

In this part we will go trough necessary steps for successful upgrade of Exchange 2007 Cluster Continuous Replication (CCR) Cluster to Service Pack 2.

Installing Service Pack 2

Upgrading CCR Cluster to SP2 is different from upgrading non-clustered Mailbox Role to SP2 in many ways. Notice that in previous parts we were using both GUI and unattended mode but only option for cluster upgrade is using unattended mode.

pow13_1

Required permissions

What are the minimal permissions you need for successful upgrade? Exchange Server Administrator membership and Local Administrator on servers is required.

Demo infrastructure

For the demo purposes we will use Active node named CN-CCR01, passive node named CN-CCR02 and exchange cluster named CN-EC01.

Upgrade steps for Passive Node (CN-CCR02)

  • Move all Cluster Groups to active node (CN-CCR01).
  • Set Windows Firewall/Internet Connection Sharing (ICS) service to Manual or Automatic and start it. This service is disabled by default. During upgrade procedure this allows setup to add firewall exceptions for Exchange Server services. You can stop and disable this service after upgrade!
    It also works if you leave Windows Firewall/Internet Connection Sharing disabled but no firewall exceptions for Exchange Server services are created during setup. I recommend that you start Windows Firewall/ICS service during setup and than stop/disable it if you are not using Windows Firewall service!
  • Stop any services that have open handles to performance counters (for example: Performance Logs and Alerts, MOM agents,...) - performance counters are changed during upgrade procedure.
  • Stop, and then restart the Remote Registry service.
  • From command prompt run setup.com /m:upgrade from folder with SP2 setup files.
  • pow13_2

  • After successful upgrade reboot Passive Node (CN-CCR02).
  • Log on to server after reboot and open Exchange Management Shell.
  • Use the Stop-ClusteredMailboxServer cmdlet to stop the clustered mailbox server.

    Stop-ClusteredMailboxServer CN-EC01 -StopReason "SP2 Upgrade."
  • pow13_3

  • Use Move-ClusteredMailboxServer cmdlet to move the clustered mailbox server (CMS) from Active Node (CN-CCR01) to Passive Node (CN-CCR02). You must run this from Passive Node (CN-CCR02).
    Move-ClusteredMailboxServer CN-EC01 -TargetMachine CN-CCR2 -MoveComment "SP2 Upgrade."
  • From command prompt run setup.com /upgradecms from folder with SP2 setup files.
  • pow13_4

    Upgrade steps for Active Node (CN-CCR01)

    • Set Windows Firewall/Internet Connection Sharing (ICS) service to Manual or Automatic and start it. This service is disabled by default. During upgrade procedure this allows setup to add firewall exceptions for Exchange Server services. You can stop and disable this service after upgrade!
    • Stop any services that have open handles to performance counters (for example: Performance Logs and Alerts, MOM agents,...) - performance counters are changed during upgrade procedure.
    • Move Windows Cluster "Cluster Group" to Passive Node
      Cluster group "cluster group" /move

    pow13_5

  • Stop, and then restart the Remote Registry service.
  • From command prompt run setup.com /m:upgrade from folder with SP1 setup files.
  • Reboot node after successful upgrade.
  • You can disable Windows Firewall/Internet Connection Sharing (ICS) now.
  • Move Cluster Group and CMS back to Active Node (CN-CCR01).
  • Edited on 1.4.2010…

    I’m sorry but somehow I managed to “lost” this post and it was not published before… :)

    Posted in: Exchange | Microsoft | POW

    Tags:

    POW #12 – Exchange Server 2007 SP2 (Part 2)

    January 25, 2010 at 2:43 PM2102
    POW_Blue_S


    This is the second part of upgrading procedure for Exchange Server 2007 SP2. In the fist part we looked into necessary steps for getting Windows ready and Active Directory ready for Exchange Server 2007 SP2.


    Installation order

    There is nothing specific in the installation order of Exchange Server 2007 Service Pack 2. You should stick with standard installation order for Exchange Server 2007:

    1. Upgrade all Client Access Servers
    2. Upgrade all HUB Transport Servers
    3. Upgrade all EDGE Transport Servers (can be upgraded later but not before HUB Transport Servers)
    4. Upgrade all Mailbox Servers
    5. Upgrade all Unified Messaging Servers

    In multi site environment upgrade site by site in the above order (not for example all Client Access Server across multiple sites! and than next role). Upgrade internet facing site(s) first.

    Non-Clustered Exchange Servers

    Before proceeding with SP2 installation make sure that any 3rd party application is compatible with SP2 (for example: antivirus software, backup software, archive software,…) and upgrade them if necessary.

    Run setup.exe from location with extracted SP1 files.

    screen1

    If you know what you are doing, then click Install, otherwise PLEASE click Plan and read about Service Pack 2. After clicking on Install you receive window describing new features in SP1.

    screen2

    Click Next and accept License Agreement. If all prerequisites are OK you can click Upgrade. Otherwise read carefully and resolve issues.

    screen5

    Note: although screenshots are taken from installation on Edge server all steps are the same if you are installing it on non-clustered servers.

    Review installation steps and click Finish, if everything is OK. If there are errors or warnings, review and resolve them.

    Posted in: Exchange | Microsoft | POW

    Tags:

    POW #10 – Exchange Server 2007 SP2 (Part 1)

    December 22, 2009 at 3:24 PM2102
    POW_Blue_S

    As many of you probably know, Service Pack 2 for Exchange Server 2007 is one of the prerequisites for introducing Exchange Server 2010 into existing Exchange organization.

    Beside many fixes, Service Pack 2 for Exchange Server 2007 also includes some cool new features:

    • Enhanced Auditing: New Exchange auditing events and audit log repository enable Exchange administrators to more easily audit the activities occurring on their Exchange servers. It allows the right balance of granularity, performance, and easy access to audited events via a dedicated audit log repository. This simplifies the auditing process and makes review of audited events easier by segregating audited events in a dedicated location.
    • Exchange Volume Snapshot Backup Functionality: A new backup plug-in has been added to the product that will enable customers to create Exchange backups when a backup is invoked through the Windows Server 2008 Backup tool. Exchange Server 2007 didn't have this capability on Windows Server 2008 and additional solutions were required to perform this task.
    • Dynamic Active Directory Schema Update and Validation: The dynamic AD schema update and validation feature allows for future schema updates to be dynamic deployed as well as proactively preventing conflicts whenever a new property is added to the AD schema. Once this capability is deployed it will enable easier management of future schema updates and will prevent support issues when adding properties that don't exist in the AD schema.
    • Public Folder Quota Management: SP2 enables a consistent way to manage quotas by improving the current PowerShell cmdlets to perform quota management tasks.
    • Centralized Organizational Settings: SP2 introduces new PowerShell option that enable centralized management of many of the Exchange organization settings.
    • Named Properties cmdlets: SP2 enables Exchange administrators to monitor their named property usage per database.
    • New User Interface for Managing Diagnostic Logging: SP2 enables Exchange administrators to easily configure and manage diagnostic logging from within the Exchange Management Console.

    Update your server(s)!

    I strongly recommend that you install latest Service Packs and hotfixes for your operating system and installed software. Please note that Exchange Server 2007 (SP2) is only supported on Windows Server 2003, Windows Server 2003 R2 and on Windows Server 2008. Windows Server 2008 R2 is not supported!

    Windows Installer 4.5

    You need to deploy Windows Installer 4.5 on all target Exchange Server 2007 servers prior installing Service Pack 2.

    Download Windows Installer 4.5 for Windows Server 2003 SP1, Windows Vista SP1 and Windows Server 2008 RTM from Microsoft Download:

    Download: Windows Installer 4.5 Redistributable

    Please note that Windows Installer 4.5 is already included in Windows Server 2008 SP2 and Windows Vista SP2.

    Backup Active Directory and Exchange!

    Please backup Active Directory and Exchange (especially Databases) before Active Directory preparation and Exchange Server 2007 SP1 installation. You should consider reading my previous blog post named Importance of good backups.

    Prepare Active Directory

    Not all steps are necessary in simple Active Directory setup (single domain forest). So here are necessary steps to prepare Active Directory for Exchange Server 2007 Service Pack 2. The advantage of running steps separately is that you can use account which has minimum permissions necessary for task.

    • Run  setup /PrepareSchema – You need to run this with domain account that is member of Schema Admins and Enterprise Admins security groups. Make sure that you run this commands from server that is in the same Active Directory Site as Schema Master DC. (Note: You must not run this command in a forest in which you do not plan to run setup /PrepareAD. If you do, the forest will be configured incorrectly, and you will not be able to read some attributes on user objects.).
    • Run setup /PrepareAD - You need to run this with domain account that is member of Enterprise Admins security group. Make sure that you run this commands from server that is in the same Active Directory Site as Schema Master DC. In order to support the new Role Based Access Control (RBAC) model in Exchange Server 2010, a new security group is created inside Microsoft Exchange Security Groups OU named Exchange Trusted Subsystem.


      pow10_1
    • Run setup /PrepareDomain to prepare local domain, run setup /PrepareDomain:exlab.exchange.pri to prepare specific domain, run setup /PrepareAllDomains to prepare all domains in forest. Please note that /PrepareAD prepares current (local) domain during process. If you have single domain Active Directory forrest, running /PrepareDomain is not needed. PrepareDomain in Exchange Server 2007 SP2 does not include ACEs introduced by Exchange Server 2010.

    After you run each command, you should wait for the changes to replicate across your Exchange Organization. It can take a while in large Active Directory site topology. You can always force replication via Active Directory Sites and Services MMC.


    How do you verify successful preparation of Active Directory?

    Setup.com /PrepareSchema sets value of rangeUpper attribute of ms-Exch-Schema-Version-Pt to 14622 after successful finish.

    pow10_2 

    pow10_3

    Setup.com /PrepareAD sets value of objectVersion attribute of <Organization Name> container to 11222 after successful finish.

    pow10_4

    pow10_5


    Installation order

    There is nothing specific in the installation order of Exchange Server 2007 Service Pack 2. You should stick with standard installation order for Exchange Server 2007:

    1. Upgrade all Client Access Servers
    2. Upgrade all HUB Transport Servers
    3. Upgrade all EDGE Transport Servers (can be upgraded later but not before HUB Transport Servers)
    4. Upgrade all Mailbox Servers
    5. Upgrade all Unified Messaging Servers

    In multi site environment upgrade site by site in the above order (not for example all Client Access Server across multiple sites! and than next role). Upgrade internet facing site(s) first.


    Links:

    Posted in: Exchange | Active Directory | POW

    Tags:

    POW #9 – Exchange Server 2007 Edge & DNS Server

    September 2, 2009 at 6:50 PMSaso Erdeljanov

    POW_Blue_S


    I noticed that some of the users are running Exchange Server 2007 Edge and public DNS Server on the same server.

    Problem

    There are some issues with services failing at start up if following is true:

    • Exchange Server 2007, Exchange Server 2007 SP1, Exchange Server 2010 (Edge Role).
    • Windows Server 2003, Windows Server 2008, Windows Server 2008 R2.
    • DNS Server role is installed.
    • Hotfix KB951746 is installed.

    You receive following error and all Exchange services are stopped.
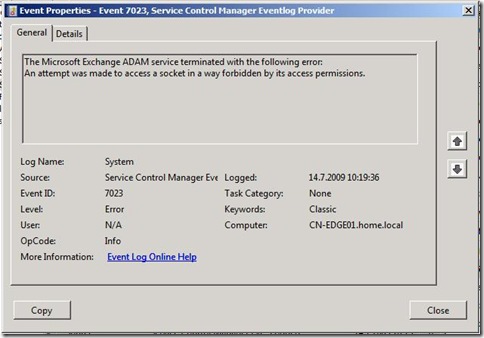
    pow9_error1

    Log Name:      System
    Source:        Service Control Manager
    Date:          14.7.2009 10:19:36
    Event ID:      7023
    Task Category: None
    Level:         Error
    Keywords:      Classic
    User:          N/A
    Computer:      EDGE.exchange.pri
    Description:
    The Microsoft Exchange ADAM service terminated with the following error:
    An attempt was made to access a socket in a way forbidden by its
    access permissions.

    So let’s start troubleshooting… ;-)

    If we take a look with netstat we can see that DNS Service (dns.exe) is using 50636 port.

    pow9_error2

    Exchange Server uses Active Directory Lightweight Directory Services (AD LDS), previous known as Active Directory Application Mode (ADAM), for storing Exchange (Organization)configuration. By default, the Edge Transport server uses the non-standard port 50636 for EdgeSync (Secure LDAP). We can check that with dsdbutil.

    • Open cmd.exe, type dsdbutil and press Enter.
    • Type list instances and press Enter.

    pow9_error3

    Issue is with hotfix KB951746 (MS08-037: Description of the security update for DNS in Windows Server 2008, in Windows Server 2003, and in Windows 2000 Server (DNS server-side): July 8, 2008).

    After security update KB951746 is installed on Windows Server 2008 (RTM/SP2), this issue occurs because the DNS server’s method of port allocation changes, and this change could prevent AD LDS from obtaining the port that it requires to function correctly.

    By default, after security update KB951746 is installed, the DNS server randomly allocates 2,500 UDP ports in the ephemeral port range. This is new behavior that is introduced by this update. A conflict may occur if one of these randomly allocated ports is a port that an AD LDS instance has to use.

    We can check the size of socket pool with dnscmd:
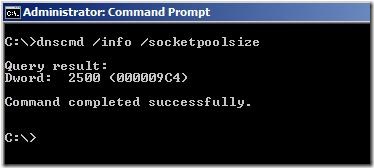
    pow9_error5


    Background information

    To comply with Internet Assigned Numbers Authority (IANA) recommendations, Microsoft has increased the dynamic client port range for outgoing connections in Windows Vista and in Windows Server 2008. The new default start port is 49152, and the default end port is 65535.

    We can check ephemeral port range in Windows Server 2008 witch netsh.
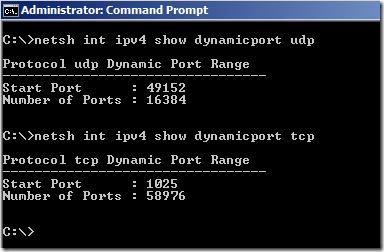
    pow9_error4

    This is a change from the configuration of earlier versions of Microsoft Windows that used a default port range of 1025 through 5000.

    In Windows Server 2003 or in Windows 2000 Server, the value of the MaxUserPort registry entry defines the ephemeral port range. The range is from 1024 to the value that is defined by the MaxUserPort registry entry.
    After you install security update 953230 on Windows Server 2003 and down-level platforms, the following conditions are true:

    • If the value of the MaxUserPort registry entry is set, the ports are allocated randomly from the [1024, MaxUserPort] range.
    • If the value of the MaxUserPort registry entry is not set, the ports are allocated randomly from the [49152, 65535] range.

    In Windows Server 2008:

    • Ephemeral port allocation and the MaxUserPort registry entry:
      In Windows Server 2008 or in Windows Vista, the value of the MaxUserPort registry entry signifies the number of ephemeral ports. The range is from the [start port, start range + MaxUserPort]. The default start port is port 49152.
    • Effective ephemeral port range:
      Ephemeral port allocation occurs in the [49152-65535] port range before you install security update 953230 on Windows Server 2008. This port allocation behavior does not change after you install security update 953230.

    Solution for Windows Server 2003

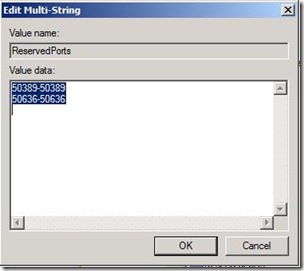
    We need to reserve Ephemeral port range for Exchange Server 2007 Edge AD LDS instance. We need to specify reserved ports in registry.

    • Start regedit.exe
    • Locate following registry key:
      HKEY_LOCAL_MACHINE\SYSTEM\CurrentControlSet\Services\Tcpip\Parameters
    • Create New Multi-String Value with name ReservedPorts
    • Enter following values for EDGE Ports that we want to exclude:
      50389-50389
      50636-50636 


        pow9_error6 

       pow9_error7
    • Reboot server

    Solution for Windows Server 2008

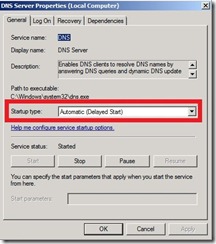
    Although we can change port range in Windows Server 2008 there is simple trick that does the job. We can change DNS Server service startup type to Automatic (Delayed Start).
    pow9_error10

    Solution for Windows Server 2008 R2

    Windows Server 2008 R2 DNS Server provides SocketPoolPortExclusionList that would allow us to exclude certain ports from DNS Server.

    Dnscmd /Config /SocketPoolPortExclusionList

    Exchange Server 2007 & Windows Server 2008 R2?

    I was warned that mentioning Windows Server 2008 R2 in post of Exchange Server 2007 could be misleading (Thanks to Miha Pihler!). Some quick facts about Exchange Server 2007 and Windows Server 2008 R2:

    • Exchange Server 2007 is NOT supported on Windows Server 2008 R2
    • You need to deploy Update Rollup 9 for Exchange Server 2007 SP1 or SP2 for Exchange Server 2007 if you intend to run DC/GC servers on Windows Server 2008 R2

    Links

    Posted in: DNS | Exchange | Microsoft | POW | Windows

    Tags:

    POW #7 - DPM 2007 SP1 Error 0x80004002

    January 5, 2009 at 11:30 PMSaso Erdeljanov

    POW_Blue_S

    After updating my Microsoft System Center Data Protection Manager 2007 (DPM 2007) to Service Pack 1 (SP1) I received a bunch of errors regarding inconsistency and recovery points creation.

    dpm01_error


    dpm02_error

    I was looking trough MSDPMCurr.errlog (located in C:\Program Files\Microsoft DPM\DPM) and found following error:

    GetDifferentialSoftwareSnapshotMgmt3Interface () failed: (0x80004002)

    dpm03_error

    It appears that Service Pack 1 does not correctly register VSS writer...

    After searching around I found solution on Ask The Core Team blog. You need to re-register vss_ps.dll on server.

    Solution:

    • Run cmd.exe (with administrative privileges in Windows Server 2008)
    • Run regsvr32 %windir%\System32\vss_ps.dll
    • Restart Volume Shadow Copy service

    Link:

    Posted in: Disaster Recovery | Exchange | Microsoft | POW

    Tags:

    POW #6 - Exchange Server 2007 SP1 & IPv6

    December 23, 2008 at 11:35 AMSaso Erdeljanov

    POW_Blue_S

    As we know from previous post Service Pack 1 for Exchange Server 2007 brings support for IPv6 but only in combination with Windows Server 2008 and IPv4.


    But there were some known issues with IPv6. For example:

    • Outlook Anywhere connectivity issue (DSProxy ::1:6004) - KB950138

    Issue mentioned above was most annoying since you received login screen multiple times and was still unable to connect. This issue was already fixed and update is included in Update Rollup 4 for Exchange Server 2007 SP1. Update Rollup 5 for Exchange Server 2007 SP1 is the latest version at the moment and I recommend you strongly to apply it.

    IPv6 recommendation

    There is only one simple rule. Disable IPv6 if you do not need it!

    Disabling IPv6

    • Uncheck Internet Protocol Version 6 (TCP/IPv6) on network card.
      IPv6_1
    • The above step is not enough! Remove or comment out the line ::1     localhost in HOSTS file.

      IPv6_2
    • Disable IPv6 in registry.

      HKLM\System\CurrentControlSet\Services\Tcpip6\Parameters
      DWORD: DisabledComponents
      Value: 0xFFFFFFFF


      IPv6_3

    That's it. :)


    Merry Christmas and a Happy New Year!

    08_links

    I  wish you all Merry Christmas and a Happy New Year! Here are some free e-books for cold days... :)

    Posted in: Exchange | POW | Windows Server 2008

    Tags:

    POW #5 - Windows Server 2008 & Exchange Server 2007 SP1

    December 5, 2008 at 1:42 PMSaso Erdeljanov

    POW_Blue_S

    I guess many of you have already heard phrase "Windows Server 2008 & Exchange Server 2007 SP1: Better Together"? :) In general this is true but there are some gotchas!

    Benefits
    • Support for multi-subnet failover clusters
    • Better performance of file copy operations (SMBv2)
    • Reduced downtime for hardware maintenance (Hot add, remove, replace of core hardware components)
    • Reduced downtime for fixing NTFS issues (Self-Healing NTFS)
    • Greater scalability of TCP/IP connections (Client Access Server especially; Next Generation TCP/IP Stack)
    • Integrated Exchange Server 2007 prerequisites (PowerShell,...)
    • IPv6 support (only in combination with Windows Server 2008 and IPv4)
    Installing Exchange Server 2007 prerequisites

    The easiest way to install all prerequisites on windows Server 2008 is with ServerManagerCmd command line utility.

    Exchange Management Tools

    ServerManagerCmd -i PowerShell

    If you want to manage all internal server roles including CAS role you must also install following IIS components. Note that this also applies if you have stand alone HUB Transport server and you want to manage CAS server from it.

    ServerManagerCmd -i Web-Metabase
    ServerManagerCmd -i Web-Lgcy-Mgmt-Console

    Hub Transport Server

    ServerManagerCmd -i PowerShell

    Edge Transport Server

    ServerManagerCmd -i PowerShell
    ServerManagerCmd -i ADLDS (AD LDS - Active Directory Lightweight Directory Services; previously known as ADAM - Active Directory Application Mode)

    Mailbox Server

    ServerManagerCmd -i PowerShell
    ServerManagerCmd -i Web-Server
    ServerManagerCmd -i Web-ISAPI-Ext
    ServerManagerCmd -i Web-Metabase
    ServerManagerCmd -i Web-Lgcy-Mgmt-Console
    ServerManagerCmd -i Web-Basic-Auth
    ServerManagerCmd -i Web-Windows-Auth
    ServerManagerCmd -i Failover-Clustering (if Mailbox Server will be clustered)

    Client Access Server

    You don't need a separate command for every component. Instead you can write every component you need separated with space.

    ServerManagerCmd -i PowerShell Web-Server Web-ISAPI-Ext Web-Metabase Web-Lgcy-Mgmt-Console Web-Basic-Auth Web-Digest-Auth Web-Windows-Auth Web-Dyn-Compression RPC-over-HTTP-proxy

    Unified Messaging

    ServerManagerCmd -i PowerShell
    ServerManagerCmd -i Desktop-Experience (audio/video codecs required by UM)

    Exchange Server 2007 SP1 Update Rollup 5

    Update Rollup 5 resolves some important issues in combination Windows 2008/Exchange 2007.

    Here are some of more important updates:

    • Exchange 2007 CAS cannot copy the OAB from the OAB share on Windows Server 2008-based Exchange 2007 CCR clusters (KB954197)
    • The OAB generation is unsuccessful and Event IDs 9328 and 9373 are logged in the Application log in a Windows Server 2008-based Exchange 2007 Single-Copy cluster environment (KB957978)
    • Exchange Server 2007 Update Rollup 3 does not update the Outlook Web Access Logon.aspx file after you modify the file (KB956582)

    Complete list of included updates: Description of Update Rollup 5 for Exchange Server 2007 Service Pack 1 (KB953467).


    The Christmas Wish!

    At the moment there is no build in exchange-aware backup solution in Windows Server 2008. We are still waiting for VSS-based plug-in for Windows Server Backup! Ultimate (and cheap) backup solution at the moment is of course Microsoft System Center Data Protection Manager!

    Gift!

    Well... it's not from me but anyway... :) Here is a free copy of Windows PowerShell Workbook: Server Administration!

    Posted in: Exchange | POW | Windows Server 2008

    Tags:

    POW #4 - Send connector external FQDN in HELO/EHLO banner

    October 27, 2008 at 1:55 PM2102
    POW_Blue_S

    Pretty common problem this days is around specified FQDN for external connections from Exchange 2007 HUB servers.

    For demo purposes let's say our internal FQDN of Exchange 2007 HUB server is DEMO-E2K7SP1.demo.pri and external FQDN is demomail.exchange.si.

    Specify FQDN for Send Connector

    We need to specify FQDN for each send connector we created for internet delivery. In our case we have send connector named Internet. Let's specify FQDN:

    Set-SendConnector -Identity "Internet" -Fqdn demomail.exchange.si

    As you can see demomail.exchange.si is specified as FQDN for above mentioned send connector. Please do not forget to also create/use certificate with Subject Name (or Subject Alternative Name) demomail.exchange.si.

    fqdn1

    Let's see what will be present in mail header at recipient side. As you can see bellow in the first red marked part demomail.exchange.si FQDN was used at HELO/EHLO step when contacting recipient mail server.

    mail1

    As you may also noticed DEMO-E2K7SP1.demo.pri is also visible in mail header. There is nothing wrong with that! It's expected behavior of every mail server in the planet. Full 'travel' path is always included in message header.

    How do I hide internal servers from message header?

    My recommended solution is with Transport Rules usage. Here is sample transport rule that strip Receive part from message header.

    Create new transport rule:

    tr1

    Specify Condition from users Inside the organization, sent to users Outside the organization and Action remove header (Received).

    tr2

    If we look again into message header you will notice that internal server is not visible anymore (Received: from DEMO-E2K7SP1.demo.pri). Removing other parts from message header can also be done with Transport Rules.

    mail2

    I hope this problem with distinguishing between configuration errors and records in message header is just a bit more clear now.

    Posted in: Exchange | Microsoft | POW

    Tags:

    POW #3 - Enable Windows Server Backup support for Hyper-V

    October 8, 2008 at 9:41 AM2102

    POW_Blue_SDid you try to backup Hyper-V Virtual Machines with Windows Server backup and received Event ID 521 error on Hyper-V host?


    Backup started at '7.10.2008 23:21:14' failed as Volume Shadow copy operation failed for backup volumes with following error code '2155348129'. Please rerun backup once issue is resolved.

    vss_error1

     Event ID 12302 error on guest computer?

    Volume Shadow Copy Service error: An internal inconsistency was detected in trying to contact shadow copy service writers.  Please check to see that the Event Service and Volume Shadow Copy Service are operating properly.

    vss_error2

    Result of running vssadmin list writers command is empty?

    vss_error3

    Event ID 10102 error appears in Microsoft-Windows-Hyper-V-VMMS/Admin Event Log?

    Failed to create the backup of virtual machine 'GUEST01'. (Virtual machine ID 0FBA408B-B269-4169-9278-EC650FEEBB1B)

    vss_error4

    Solution resides in the registry ;).

    Fix VSS Event ID 12302 on Hyper-v guests

    In order to get rid off Event ID 12302 on Virtual Machines you need to follow the following procedure:

    • Backup registry key:
      HKLM\Software\Microsoft\EventSystem\{26c409cc-ae86-11d1-b616-00805fc79216}\Subscriptions

      vss_error5
    • Delete registry key Subscriptions.
    • Restart Virtual Machine (key will be regenerated after restart).
    • Verify that vssadmin list writers command returns valid list of writers.

      vss_error6

     Enable Hyper-V VSS Writer with Windows Server Backup

    In order to enable VSS backups of Hyper-V Virtual Machines, you need to add the following registry keys and String Value to enable Hyper-V VSS Writer with Windows Server Backup on Hyper-V host.

    Key:

    HKEY_LOCAL_MACHINE\SOFTWARE\Microsoft\Windows NT\CurrentVersion\
    WindowsServerBackup\Application Support\{66841CD4-6DED-4F4B-8F17-FD23F8DDC3DE}

    String Value:

    Name: Application Identifier
    Type: REG_SZ
    Value: Hyper-V

    vss_error7

    Also check that Hotfix KB956697 (Windows Server 2008 Hyper-V VSS writer is not used during a backup job because of corrupted or invalid virtual machine configuration files.) is installed!

    Microsoft Hyper-V Server 2008

    I also have great news for all Hyper-V lovers. Microsoft released Microsoft Hyper-V Server 2008! The best thing about it is that it's FREE! Microsoft Hyper-V Server 2008 is a stripped version of Windows Server 2008 Core and contains only Windows Hypervisor, Windows Server driver model and virtualization components.

    Microsoft® Hyper-V™ Server 2008 is a stand-alone product that provides a simplified, reliable, cost-effective and optimized virtualization solution enabling organizations to improve server utilization and reduce costs. It allows organizations to consolidate workloads onto a single physical server and is a good solution for organizations who want a basic and simplified virtualization solution for consolidating servers as well as for development and test environments. Low utilization infrastructure workloads, departmental applications and simple branch office workloads are also candidates to virtualize using Hyper-V Server 2008.

    Links: