POW #13 – Exchange Server 2007 SP2 (Part 3)
April 1, 2010 at 9:49 PM
—
2102
 In previous parts we looked into necessary procedures for preparing Active Directory and upgrading HUB/CAS/MBX roles (or single Exchange Server with HUB, CAS and Mailbox role installed) to Service Pack 2.
In this part we will go trough necessary steps for successful upgrade of Exchange 2007 Cluster Continuous Replication (CCR) Cluster to Service Pack 2.
Installing Service Pack 2
Upgrading CCR Cluster to SP2 is different from upgrading non-clustered Mailbox Role to SP2 in many ways. Notice that in previous parts we were using both GUI and unattended mode but only option for cluster upgrade is using unattended mode.

Required permissions
What are the minimal permissions you need for successful upgrade? Exchange Server Administrator membership and Local Administrator on servers is required.
Demo infrastructure
For the demo purposes we will use Active node named CN-CCR01, passive node named CN-CCR02 and exchange cluster named CN-EC01.
Upgrade steps for Passive Node (CN-CCR02)
Move all Cluster Groups to active node (CN-CCR01).
Set Windows Firewall/Internet Connection Sharing (ICS) service to Manual or Automatic and start it. This service is disabled by default. During upgrade procedure this allows setup to add firewall exceptions for Exchange Server services. You can stop and disable this service after upgrade!
It also works if you leave Windows Firewall/Internet Connection Sharing disabled but no firewall exceptions for Exchange Server services are created during setup. I recommend that you start Windows Firewall/ICS service during setup and than stop/disable it if you are not using Windows Firewall service!
Stop any services that have open handles to performance counters (for example: Performance Logs and Alerts, MOM agents,...) - performance counters are changed during upgrade procedure.
Stop, and then restart the Remote Registry service.
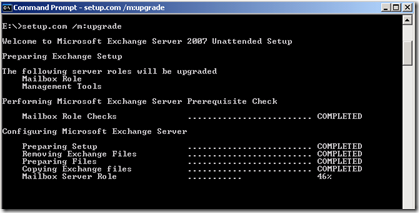
From command prompt run setup.com /m:upgrade from folder with SP2 setup files.

After successful upgrade reboot Passive Node (CN-CCR02).
Log on to server after reboot and open Exchange Management Shell.
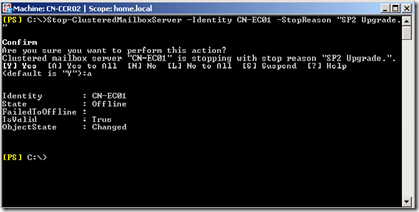
Use the Stop-ClusteredMailboxServer cmdlet to stop the clustered mailbox server.
Stop-ClusteredMailboxServer CN-EC01 -StopReason "SP2 Upgrade."

Use Move-ClusteredMailboxServer cmdlet to move the clustered mailbox server (CMS) from Active Node (CN-CCR01) to Passive Node (CN-CCR02). You must run this from Passive Node (CN-CCR02).
Move-ClusteredMailboxServer CN-EC01 -TargetMachine CN-CCR2 -MoveComment "SP2 Upgrade."
From command prompt run setup.com /upgradecms from folder with SP2 setup files.

Upgrade steps for Active Node (CN-CCR01)
- Set Windows Firewall/Internet Connection Sharing (ICS) service to Manual or Automatic and start it. This service is disabled by default. During upgrade procedure this allows setup to add firewall exceptions for Exchange Server services. You can stop and disable this service after upgrade!
- Stop any services that have open handles to performance counters (for example: Performance Logs and Alerts, MOM agents,...) - performance counters are changed during upgrade procedure.
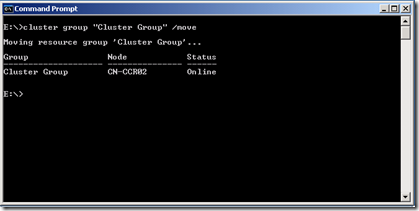
- Move Windows Cluster "Cluster Group" to Passive Node
Cluster group "cluster group" /move

Stop, and then restart the Remote Registry service.
From command prompt run setup.com /m:upgrade from folder with SP1 setup files.
Reboot node after successful upgrade.
You can disable Windows Firewall/Internet Connection Sharing (ICS) now.
Move Cluster Group and CMS back to Active Node (CN-CCR01).
Edited on 1.4.2010…
I’m sorry but somehow I managed to “lost” this post and it was not published before… :)